Thursday, November 23, 2023

A Step-by-Step Guide: How to Reset TP-Link Extender Using Multiple Methods

 TP-Link extenders are excellent devices that boost your Wi-Fi signal, providing better coverage and eliminating dead zones in your home or office. However, there may be instances where you need to reset TP-Link extender, whether to troubleshoot connectivity issues or to reconfigure the settings. In this blog, we will explore multiple methods to reset your TP-Link extender, ensuring a smooth and hassle-free process.

how to reset tp link extender


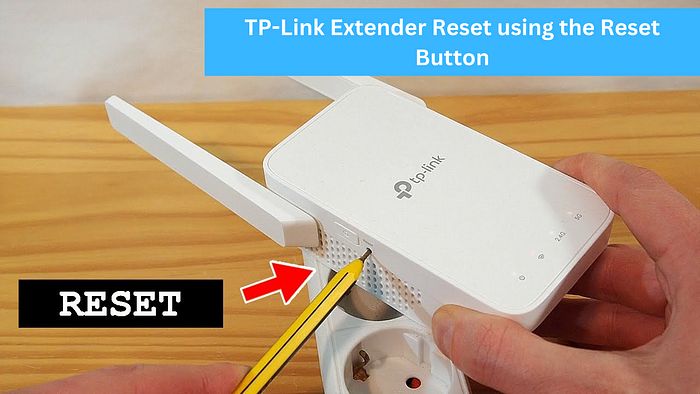
Method 1: Reset Button on the Extender

  1. Locate the Reset Button: On your TP-Link extender, you will find a small reset button. This button is typically recessed to avoid accidental presses.
  2. Press and Hold: With the extender powered on, use a paperclip or a similar pointed object to press and hold the reset button for about 10 seconds. Keep the button depressed until you see the LED lights on the extender start flashing.
  3. Wait for Reboot: Release the reset button and wait for the extender to reboot. This may take a few minutes. Once the reboot is complete, your TP-Link extender will be reset to its factory settings.

Method 2: Using the Web Management Interface

  1. Access the Web Interface: Connect your computer or mobile device to the TP-Link extender’s Wi-Fi network. Open a web browser and enter the default IP address (often http://192.168.0.254 or http://tplinkrepeater.net) in the address bar.
  2. Log In: Enter your extender’s username and password. If you haven’t changed these, the default credentials are usually “admin” for both the username and password.
  3. Navigate to System Tools: Once logged in, go to the “System Tools” or a similar section in the web management interface.
  4. Choose Factory Defaults: Look for the “Factory Defaults” or “Restore” option. Click on it, and you may be prompted to confirm the reset. Confirm and wait for the extender to reset.

Method 3: TP-Link Tether App

  1. Install the TP-Link Tether App: Download and install the TP-Link Tether app on your smartphone or tablet.
  2. Connect to the Extender: Launch the app and connect to your TP-Link extender using the provided instructions.
  3. Access Settings: Navigate to the settings or management section within the app.
  4. Reset to Factory Defaults: Look for the option to reset to factory defaults or a similar function. Follow the on-screen instructions to initiate the reset.

Conclusion:

Resetting your TP-Link extender can be necessary for troubleshooting or when you need to start afresh with its configuration. By following these methods, you can reset TP-Link extender with ease. Remember to reconfigure your extender settings after the reset to ensure optimal performance and security. If you encounter any difficulties, consult the user manual or TP-Link’s support resources for additional guidance.

Source Link: https://www.wirelessextendersetup.org/tp-link-extender-reset/

Sunday, November 5, 2023

How to Reset TP Link Extender? (3 Quick Methods)

 TP-Link extenders are valuable devices that help you extend your Wi-Fi network’s reach, ensuring you can enjoy seamless internet connectivity throughout your home. However, there may be instances when you need to reset your TP-Link extender, whether due to configuration issues, forgotten passwords, or other connectivity problems. In this article, we’ll walk you through three methods to reset TP-Link extender and get your network back up and running. Call +1(855)201–8071 our expert team for a hassle-free TP-Link extender reset, ensuring a swift and smooth resolution to your connectivity issues.


Method 1: TP-Link Extender Reset using the Reset Button


The most straightforward way to reset TP-Link extender is by using the reset button on the device itself. Follow these steps to reset your extender:


How to Reset TP Link Extender

  1. Locate the reset button: On your TP-Link extender, there is a small reset button, often recessed to prevent accidental resets. It’s usually located on the side or back of the device.
  2. Press and hold the reset button: Using a paperclip or a similarly small, pointed object, press and hold the reset button for about 5–10 seconds. You’ll need to keep holding it until you see the device’s LED indicators start to flash.
  3. Wait for the reset: Once the LED indicators begin flashing, release the reset button. Your extender is now resetting to its factory default settings.
  4. Reconfigure your extender: After the reset process is complete, you’ll need to set up your TP-Link extender again by following the initial installation instructions provided with the device.


Method 2: TP-Link Extender Reset using via the Web Interface


If you can still access your TP-Link extender’s web interface, you can reset it from there. Here’s how to do it:


How to Reset TP Link Extender
  1. Connect to the extender: Ensure your computer or mobile device is connected to the TP-Link extender’s network.
  2. Access the web interface: Open a web browser and enter the extender’s IP address (typically 192.168.0.254 or 192.168.1.1) in the address bar. You’ll be prompted to log in
  3. Log in: Enter your extender’s username and password. If you haven’t changed these credentials, the default username and password are usually “admin.”
  4. Navigate to the reset option: In the web interface, locate the “System Tools” or “Management” section. Look for an option like “Factory Defaults” or “Restore to Factory Settings.”
  5. Confirm the reset: Click on the reset option and confirm that you want to reset the extender to its factory default settings. Follow any on-screen prompts.
  6. Reconfigure your extender: After the reset is complete, you will need to reconfigure your TP-Link extender by following the initial setup instructions.

Method 3: TP-Link Extender Reset using via the TP-Link Tether App


How to Reset TP Link Extender


If you’ve connected your TP-Link extender to the TP-Link Tether app, you can reset it using the app. Here’s how:


  1. Open the TP-Link Tether app: Launch the TP-Link Tether app on your mobile device.
  2. Log in: Log in to the app using your TP-Link ID and password.
  3. Select your extender: Locate and select your TP-Link extender from the list of connected devices in the app.
  4. Access extender settings: Tap on your extender to access its settings.
  5. Reset the extender: Look for an option like “Reset to Factory Defaults” or “Factory Reset” within the extender settings. Tap on it and confirm your choice.
  6. Reconfigure your extender: After the reset is complete, you will need to set up your TP-Link extender again using the TP-Link Tether app, following the initial installation instructions.

Conclusion


Resetting your TP-Link extender can solve various connectivity issues and is relatively straightforward using these three methods. Whether you choose to reset it via the reset button, the web interface, or the TP-Link Tether app, always remember to reconfigure your extender after the reset to ensure it functions correctly. With these methods at your disposal, you can quickly get your TP-Link extender back on track and enjoy a stable and extended Wi-Fi network throughout your home.

Source Link: https://www.wirelessextendersetup.org/tp-link-extender-reset/

How to setup tp link extender

  With our comprehensive guide on setting up your TP-Link extender. Bid farewell to dead zones and enjoy enhanced connectivity effortlessly....