Tuesday, December 5, 2023

How to setup tp link extender

 With our comprehensive guide on setting up your TP-Link extender. Bid farewell to dead zones and enjoy enhanced connectivity effortlessly. In this blog, we'll explore three effective ways to set up TP-Link extender, ensuring a hassle-free and boosted network performance. Experience hassle-free TP-Link WiFi extender setup – dial our +1(855)201-8071 support for expert guidance. Our team is ready to assist, ensuring a seamless and optimized extension of your wireless network.


Method 1: One-Touch WPS Setup For those seeking simplicity, the One-Touch WPS (Wi-Fi Protected Setup) method is a breeze. Follow these steps:

Plug-In and Power Up:


Plug your TP-Link extender into a power outlet and switch it on.

Locate WPS Button:


Find the WPS button on both your extender and router.

Press WPS Buttons:


Press the WPS button on your router, followed by the WPS button on your extender within 2 minutes.

Wait for Connection:


Give the devices a moment to establish a secure connection. Once done, the LED indicators will confirm a successful setup.

Method 2: Web Browser Setup: For users who prefer a more hands-on approach, the web browser setup method is a reliable option:


Connect to Extender:


Use a Wi-Fi-enabled device to connect to the default Wi-Fi network of your TP-Link extender.

Access the Web Interface:


Open a web browser and enter the default IP address of your extender (e.g., 192.168.0.1) in the address bar.
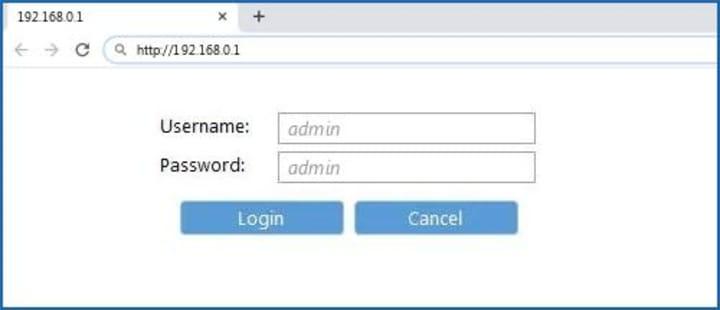
 

Add a caption (optional)


Login:


Enter the default login credentials (usually admin/admin) to access the extender's settings.

Follow Setup Wizard:


Navigate to the Quick Setup or Setup Wizard section and follow the on-screen instructions to configure your extender.

Complete and Reconnect:


Once the setup is complete, reconnect your devices to the extended Wi-Fi network.

Method 3: TP-Link Tether App: For those on the go, the TP-Link Tether app simplifies the setup process using a mobile device:

Download TP-Link Tether App:


Download and install the TP-Link Tether app from the App Store (iOS) or Google Play Store (Android).

Connect to Extender:


Connect your mobile device to the default Wi-Fi network of the extender.

Launch Tether App:


Open the TP-Link Tether app and log in.

Follow In-App Instructions:


The app will guide you through the setup process with clear instructions. Follow each step to configure your extender.

Verify Connection:


Confirm a successful setup by checking the Wi-Fi connection on your devices.

Troubleshooting Steps for TP-Link Extender Setup:

1. Power and Connectivity Check:

Ensure your TP-Link extender is plugged in and powered on. Confirm a stable connection between the extender and your router.


2. Placement Optimization:

Reposition the extender for an optimal signal. Avoid interference from electronic devices and place the extender within a reasonable range of your router.


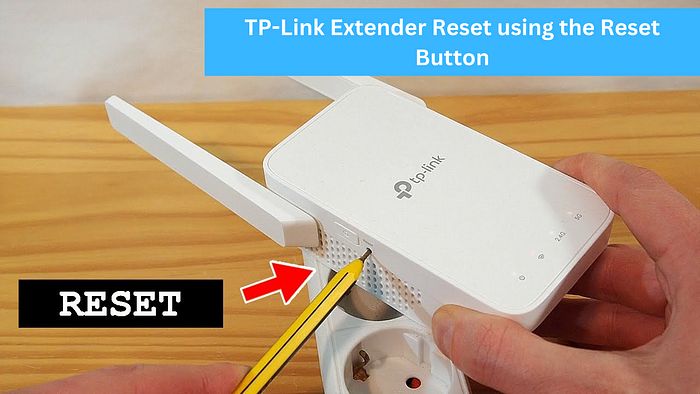
3. Reset to Factory Defaults:

If facing issues, perform a factory reset on the extender. Use a paperclip to press and hold the reset button for 10 seconds, then reattempt the setup process.


4. Verify Firmware Updates:

Check for firmware updates on the TP-Link website. Updating to the latest firmware can resolve compatibility issues and improve performance.


5. Browser Compatibility:

Ensure you are using a compatible web browser during the setup process. Chrome, Firefox, or Safari are recommended for accessing the extender's web interface.


6. Disable VPN and Proxy Settings:

Temporarily disable any VPN or proxy settings on your device, as these may interfere with the extender setup process.


7. Password Authentication:

Double-check the accuracy of the Wi-Fi password entered during the setup. Ensure it matches the credentials of your main router.


8. WPS Setup Alternative:

If encountering issues with the web-based setup, try using the WPS (Wi-Fi Protected Setup) method for a quick and straightforward alternative.


9. SSID and Channel Configuration:

Avoid duplicate SSID names with your main router and ensure the extender is operating on a different channel. Adjust these settings in the web interface if needed.


10. Contact Support:

If all else fails, reach out to our for expert assistance. Our dedicated support team is ready to help you troubleshoot and resolve any extender setup challenges.


Conclusion: With TP-Link extenders, achieving a broader and more reliable Wi-Fi coverage is a straightforward endeavor. Whether opting for the simplicity of WPS, the flexibility of web browser tp-link wifi extender setup, or the convenience of a mobile app, users can tailor the setup process to their preferences. Elevate your connectivity experience and bid farewell to Wi-Fi dead zones with TP-Link extenders.


https://www.wirelessextendersetup.org/tp-link-extender-setup-configuration/

Thursday, November 23, 2023

A Step-by-Step Guide: How to Reset TP-Link Extender Using Multiple Methods

 TP-Link extenders are excellent devices that boost your Wi-Fi signal, providing better coverage and eliminating dead zones in your home or office. However, there may be instances where you need to reset TP-Link extender, whether to troubleshoot connectivity issues or to reconfigure the settings. In this blog, we will explore multiple methods to reset your TP-Link extender, ensuring a smooth and hassle-free process.

how to reset tp link extender


Method 1: Reset Button on the Extender

  1. Locate the Reset Button: On your TP-Link extender, you will find a small reset button. This button is typically recessed to avoid accidental presses.
  2. Press and Hold: With the extender powered on, use a paperclip or a similar pointed object to press and hold the reset button for about 10 seconds. Keep the button depressed until you see the LED lights on the extender start flashing.
  3. Wait for Reboot: Release the reset button and wait for the extender to reboot. This may take a few minutes. Once the reboot is complete, your TP-Link extender will be reset to its factory settings.

Method 2: Using the Web Management Interface

  1. Access the Web Interface: Connect your computer or mobile device to the TP-Link extender’s Wi-Fi network. Open a web browser and enter the default IP address (often http://192.168.0.254 or http://tplinkrepeater.net) in the address bar.
  2. Log In: Enter your extender’s username and password. If you haven’t changed these, the default credentials are usually “admin” for both the username and password.
  3. Navigate to System Tools: Once logged in, go to the “System Tools” or a similar section in the web management interface.
  4. Choose Factory Defaults: Look for the “Factory Defaults” or “Restore” option. Click on it, and you may be prompted to confirm the reset. Confirm and wait for the extender to reset.

Method 3: TP-Link Tether App

  1. Install the TP-Link Tether App: Download and install the TP-Link Tether app on your smartphone or tablet.
  2. Connect to the Extender: Launch the app and connect to your TP-Link extender using the provided instructions.
  3. Access Settings: Navigate to the settings or management section within the app.
  4. Reset to Factory Defaults: Look for the option to reset to factory defaults or a similar function. Follow the on-screen instructions to initiate the reset.

Conclusion:

Resetting your TP-Link extender can be necessary for troubleshooting or when you need to start afresh with its configuration. By following these methods, you can reset TP-Link extender with ease. Remember to reconfigure your extender settings after the reset to ensure optimal performance and security. If you encounter any difficulties, consult the user manual or TP-Link’s support resources for additional guidance.

Source Link: https://www.wirelessextendersetup.org/tp-link-extender-reset/

Sunday, November 5, 2023

How to Reset TP Link Extender? (3 Quick Methods)

 TP-Link extenders are valuable devices that help you extend your Wi-Fi network’s reach, ensuring you can enjoy seamless internet connectivity throughout your home. However, there may be instances when you need to reset your TP-Link extender, whether due to configuration issues, forgotten passwords, or other connectivity problems. In this article, we’ll walk you through three methods to reset TP-Link extender and get your network back up and running. Call +1(855)201–8071 our expert team for a hassle-free TP-Link extender reset, ensuring a swift and smooth resolution to your connectivity issues.


Method 1: TP-Link Extender Reset using the Reset Button


The most straightforward way to reset TP-Link extender is by using the reset button on the device itself. Follow these steps to reset your extender:


How to Reset TP Link Extender

  1. Locate the reset button: On your TP-Link extender, there is a small reset button, often recessed to prevent accidental resets. It’s usually located on the side or back of the device.
  2. Press and hold the reset button: Using a paperclip or a similarly small, pointed object, press and hold the reset button for about 5–10 seconds. You’ll need to keep holding it until you see the device’s LED indicators start to flash.
  3. Wait for the reset: Once the LED indicators begin flashing, release the reset button. Your extender is now resetting to its factory default settings.
  4. Reconfigure your extender: After the reset process is complete, you’ll need to set up your TP-Link extender again by following the initial installation instructions provided with the device.


Method 2: TP-Link Extender Reset using via the Web Interface


If you can still access your TP-Link extender’s web interface, you can reset it from there. Here’s how to do it:


How to Reset TP Link Extender
  1. Connect to the extender: Ensure your computer or mobile device is connected to the TP-Link extender’s network.
  2. Access the web interface: Open a web browser and enter the extender’s IP address (typically 192.168.0.254 or 192.168.1.1) in the address bar. You’ll be prompted to log in
  3. Log in: Enter your extender’s username and password. If you haven’t changed these credentials, the default username and password are usually “admin.”
  4. Navigate to the reset option: In the web interface, locate the “System Tools” or “Management” section. Look for an option like “Factory Defaults” or “Restore to Factory Settings.”
  5. Confirm the reset: Click on the reset option and confirm that you want to reset the extender to its factory default settings. Follow any on-screen prompts.
  6. Reconfigure your extender: After the reset is complete, you will need to reconfigure your TP-Link extender by following the initial setup instructions.

Method 3: TP-Link Extender Reset using via the TP-Link Tether App


How to Reset TP Link Extender


If you’ve connected your TP-Link extender to the TP-Link Tether app, you can reset it using the app. Here’s how:


  1. Open the TP-Link Tether app: Launch the TP-Link Tether app on your mobile device.
  2. Log in: Log in to the app using your TP-Link ID and password.
  3. Select your extender: Locate and select your TP-Link extender from the list of connected devices in the app.
  4. Access extender settings: Tap on your extender to access its settings.
  5. Reset the extender: Look for an option like “Reset to Factory Defaults” or “Factory Reset” within the extender settings. Tap on it and confirm your choice.
  6. Reconfigure your extender: After the reset is complete, you will need to set up your TP-Link extender again using the TP-Link Tether app, following the initial installation instructions.

Conclusion


Resetting your TP-Link extender can solve various connectivity issues and is relatively straightforward using these three methods. Whether you choose to reset it via the reset button, the web interface, or the TP-Link Tether app, always remember to reconfigure your extender after the reset to ensure it functions correctly. With these methods at your disposal, you can quickly get your TP-Link extender back on track and enjoy a stable and extended Wi-Fi network throughout your home.

Source Link: https://www.wirelessextendersetup.org/tp-link-extender-reset/

Sunday, October 29, 2023

Troubleshooting TP-Link AC750 Setup Issues Like a Pro

A reliable and efficient router is the cornerstone of a seamless internet experience at home or in your small office. The TP-Link AC750 is a popular choice for many, thanks to its affordability and performance. In this blog, we’ll guide you through 3 methods for TP Link AC750 Setup, ensuring you get the most out of your network.


TP Link AC750 Setup

Method 1: TP-Link AC750 Setup using Web-Based

The most common method to setup TP-Link AC750 router is through the web-based setup. Here’s a step-by-step guide on how to do it:

  1. Initial Hardware Setup:
    Unbox your TP-Link AC750 router and connect it to your modem using an Ethernet cable.
    Plug in the router and turn it on.
  2. Connecting to the Router:
    Connect your computer or smartphone to the router. You can do this either via an Ethernet cable or by connecting to the router’s default Wi-Fi network. The default Wi-Fi network name (SSID) and password can usually be found on a label on the router.
  3. Access the Web Interface:
    Open a web browser and enter “http://tplinkwifi.net” or “http://192.168.0.1” into the address bar.
    You will be prompted to enter the default username and password, which is often “admin” for both. If these credentials don’t work, check your router’s manual for the correct ones.
  4. Configuration:
    Follow the on-screen instructions to configure your router’s settings. You can change the Wi-Fi name and password, set up a secure password for the router’s admin interface, and adjust other settings as needed.
  5. Save Settings:
    After configuring the router, make sure to save your settings.

Method 2: TP-Link AC750 Setup using Tether App

If you prefer a more mobile-friendly approach, TP-Link offers the Tether app, which is available for both Android and iOS devices. Here’s how to set up your TP-Link AC750 router using the app:

Initial Hardware Setup: Follow the same steps as described in Method 1.

  • Install TP-Link Tether App:
  • Download and install the TP-Link Tether app from your device’s app store.
  • Connect to the Router:
  • Connect your mobile device to the router’s Wi-Fi network or use an Ethernet cable if preferred.
    Open TP-Link Tether App:
    Launch the app, and it should automatically detect your TP-Link AC750 router.
    Configuration:
    Follow the app’s on-screen instructions to set up your router as desired, including changing the Wi-Fi network name and password.
    Save Settings:
    Once you’ve configured the router, make sure to save the settings through the app.

Method 3: TP-Link AC750 Setup using WPS Setup

Another simple way to set up your TP-Link AC750 router is by using the WPS (Wi-Fi Protected Setup) feature. This method is convenient if your devices support WPS. Here’s how to do it:

Initial Hardware Setup: Follow the same steps as described in Method 1.
Press the WPS Button:
Locate the WPS button on your router. It is often labeled “WPS” or has a WPS icon near it.
Press and hold the WPS button for a few seconds.
WPS on Your Device:
On your device (e.g., smartphone, laptop), enable WPS. This process may vary depending on your device; consult the device’s manual for instructions.
Automatic Configuration:
Your device will automatically connect to the router, and the router will configure itself based on the device’s settings.
Verification:
Ensure that your device is connected to the router, and you should have internet access.

Conclusion

Setting up your TP-Link AC750 router is a straightforward process, and you can choose the method that suits your preferences and devices. Whether you prefer the traditional web-based setup, the mobile-friendly TP-Link Tether app, or the simplicity of WPS, you’ll be enjoying a fast and reliable internet connection in no time. A well-configured router is the foundation of a smooth online experience, and the TP-Link AC750 Setup makes it easy to achieve just that.

Source Link: https://www.wirelessextendersetup.org/tp-link-extender-ac750-setup/

How to setup tp link extender

  With our comprehensive guide on setting up your TP-Link extender. Bid farewell to dead zones and enjoy enhanced connectivity effortlessly....